RFQuack: the versatile RF-analysis tool that quacks!
- Federico Maggi
- Rf , Security
- April 10, 2020
Table of Contents
RFQuack is the only versatile RF-analysis tool that quacks! 🦆 RFQuack is the evolution of a prototype to help me reverse engineer sub-GHz and 2.4GHz RF protocols based on digital packet radios.
GitHub repo: https://github.com/rfquack/RFQuack
Quickstart
git clone --recursive https://github.com/rfquack/RFQuack
cd RFQuack
pip install -r requirements.pip
vim build.env  # set your parameters and :wq
make clean build flash
Confused? I bet: this is quite a quick start. Unless you’re familiar with RFQuack, read on if you’re curious.
Introduction
OK, what does this even mean?
It’s a library firmware that allows you to sniff, manipulate, and transmit data over the air. And if you’re not happy how the default firmware functionalities or you want to change the hardware, we made it easy to extend. Consider it as the hardware-agnostic and developer-friendly version of the great YardStick One, which is based on the CC1101 radio chip. Differently from the other RF dongles, RFQuack is designed to be agnostic with respect to the radio chip. So if you want to use, say, the RF69, you can do it. If you need to use the CC1101L or CC1120, you can do it. Similarly to RFCat, RFQuack has a console-based, Python-scriptable client that allows you to set parameters, receive, transmit, and so on.
Another RF-analysis Dongle?
Not really. RFQuack is midway between software-defined radios (SDRs), which offer great flexibility at the price of a fatter code base, and RF dongles, which offer great speed and a plug-and-play experience at the price of less flexibility p(you can’t change the radio module).
RFQuack is unique in these ways:
- It’s a library firmware, with many settings, sane defaults, and rich logging and debugging functionalities.
- Supports multiple radio chips: nRF24, CC1101, basically all the chips supported by RadioLib, and we’re adding more.
- Does not require a wired connection to the host computer: the serial port is used only to display debugging messages, but the interaction between the client and the node is over TCP using WiFi (via Arduino WiFi) and GPRS (via TinyGSM library) as physical layers.
- The RFQuack client allows both high- and low-level operations: change frequency, change modulation, etc., as well as to interact with the radio chip via registers.
- The firmware and its API support the concept of packet-filtering and packet-modification rules, which means that you can instruct the firmware to listen for a packet matching a given signature (in addition to the usual sync-word- and address-based filtering, which normally happen in the radio hardware), optionally modify it right away, and re-transmit it.
So, if you need to analyze a weird RF protocol with that special packet format or that very special modulation scheme, with mixed symbol encodings (yes, I’m looking at you, CC1120 in 4-FSK mode 🤬), with RFQuack you just swap the radio shield and you can just start working right away. And if we don’t support that special radio chip, you can just craft your shield and add support to the software!
Architecture

RFQuack has a modular software and hardware architecture comprising:
- a radio chip (usually within a module)
- a micro-controller unit (MCU)
- an optional network adapter (cellular or WiFi)
The communication layers are organized as follows:
- The Python client encodes the message for RFQuack with Protobuf (via nanopb): this ensures data-type consistency across firmware (written in C) and client (written in Python), light data validation, and consistent development experience.
- The serialized messages are transported over MQTT (which allows multi-node and multi-client scenarios) or serial (when you need minimal latency).
- The connectivity layer is just a thin abstraction over various cellular modems and the Arduino/ESP WiFi (or simply serial).
- The message is decoded and handled by a software module
Builtin Modules
RFQuack comes with some builtin modules.
Auto Tuning
It may happen that you don’t know the frequency and/or the bitrate used by a transmitted. RFQuack comes with a module called guessing which automatically tries to, well, guess them!
The module comes already configured for scanning from 432MHz up to 437MHz, you can easily tweak its parameters using the CLI and use it on any carrier frequency supported by the radio module.
Example: start the module and it’ll automagically determine the carrierFreq and/or bitRate of a transmission.
RFQuack(/dev/ttyRFQ)> q.guessing.start()

result = 0
message = Started.

[... press any button on the keyfob ...]

data =  b'\x06\xaa\xaa\xaa\xaa\xaa\xaa\xaa\xaa\xaa\xaa[...]'
rxRadio = 0
millis = 130090
bitRate = 3.3333332538604736
carrierFreq = 434.4758605957031
hex data = 06aaaaaaaaaaaaaaaaaaaaaaaaaaaaaaaaaaaaaaaaaaaaaaaaaaaaaaaaaaaaaaaaaaaaaaaaaaaaaa666a95a96aaaa5[...]
Note: Currently it only supports OOK modulation, but we believe it can be extended to 2-FSK with some offset tuning (which will make a 2-FSK look like an OOK).
Frequency Scanner
Useful module to perform frequency scanning in a range of frequencies.
Mouse Jack
Module implementing mouse jack.
Packet Filtering
One of the main reasons why we created RFQuack is that we wanted to automate certain tasks in a flexible and fast way. For instance, we were building a PoC for a vulnerability in a radio protocol that, with a change in two bytes of the payload, the vulnerable receiver would execute another command. So, all we had to do was: stay in RX mode, wait for a packet matching a pattern, alter it, and re-transmit it.
Most of this could be done with an SDR or with a RF-dongle and RFCat, but in both cases you’d have to “pay” the round-trip time from the radio, to the client, and back. For certain protocols, this timing is not acceptable. RFQuack’s firmware implements this functionality natively, and exposes a simple API to configure packet filtering and manipulation.
Important: filtering and patterns are applied past any filtering performed by the radio (e.g., based on sync words, address, CRC, RSSI, LQI). If you want to consider any packet, including noise, you’ll have to disable these low-level filters enabling promiscuous mode)
q.packet_filter.add(pattern="", negateRule=bool)takes two parameters: a regular-expression pattern complying with the tiny-regex-c library (most common patterns are supported); adding a pattern means that RFQuack will discard any payload not matching that regex (or matching it, usingnegateRule); you can add multiple filters, they’ll be applied one next the other (AND logic).q.packet_filter.reset()will delete any stored filtering rule.q.packet_filter.dump()will dump to CLI any stored rule.q.packet_filter.enabledboolean that controls whatever the module is enabled, do not forget to set it!
NOTE Packet’s payload will be treated as a hex string.
Example:
RFQuack(/dev/ttyDUMMY, 115200,8,N,1)> \
  q.packet_filter.add(
      # Accept only packets starting this way.
      pattern="^aaaaaaaaaa999aa56a",
      negateRule=False
      )
result = 0
message = Rule added, there is 1 filtering rule.

RFQuack(/dev/ttyDUMMY, 115200,8,N,1)> \
  # Do not forget to enable the module!
  q.packet_filter.enabled = True
result = 0
message =
Packet Manipulator
RFQuacks comes with a powerful packet modification module:
q.packet_modification.add()takes several parameters:position(number, optional) indicates the position in the payload that will be modified (e.g., 3rd byte);content(byte, optional) indicates the content that will be modified (e.g., all octects which value is'A');pattern(optional) same as for the filter: only packets matching the pattern will be modified; if no pattern is specified, all packets will be modified.operation(enum) is the action to be performed, available operations are:- (AND, OR, XOR, NOT, SLEFT, SRIGHT) +
operandfield. - (PREPEND, APPEND, INSERT) +
payloadfield. - NOT.
- (AND, OR, XOR, NOT, SLEFT, SRIGHT) +
operand(byte) is the “right” value for the operations that need it (AND, OR, XOR, NOT, SLEFT, SRIGHT).payload(byte) is the “payload” value for the operations that need it (PREPEND, APPEND, INSERT).pattern(string) a regular-expression pattern complying with the tiny-regex-c, to restrict modifications to matching packets only.
q.packet_modification.reset()will delete any stored rule.q.packet_modification.dump()will dump to CLI any stored rule.q.packet_modification.auto_shift(boolean), if enabled the module will automatically left shifts packets matching^5555to get^aaaapackets.q.packet_modification.enabled(boolean), controls whatever the module is enabled, do not forget to set it!
Example: Let’s say that you want to invert byte 3 of all packets that end with 'XYZ' and XOR with 0x44 all bytes which value is 'A' (and in position 5) of all packets that start with 'AAA'. And you want to ignore any packet that do not contain at least 3 digits in their payload. You’re going to need two modifications and one filter:
In [72]: q.packet_filter.add(
    pattern="[0-9]{3,}"  # ignore packets not containing at least 3 digits
)

# ...

In [73]: q.packet_modification.add(
    pattern="XYZ$"  # for all packets that end in "XYZ"
    position=3,     # at position 3
    operation=4     # apply a NOT of whatever value is there
                    # (no operand needed)
)

# ...

In [74]: q.packet_modification.add(
    pattern="^AAA"  # for all packets that start with "AAA"
    content=0x42,   # for all octects which value equals A
    position=5,     # and at position 5
    operation=3     # XOR the value with the operand
    operand=0x44
)

In [76]: q.packet_filter.enabled = True # enable packet filtering
In [77]: q.packet_modification.enabled = True # enable packet manipulation
Example: Let’s say you are capturing packets by mean of a specific syncword filter; the radio will consume the preamble and the specified syncword to recognize the packet and, consequently, sends you the remaining payload. You are not happy with this and want to prepend the consumed part. Well, nothing easier:
In [78]: q.packet_modification.add(
    operation="PREPEND",                      # Select prepend action
    payload=bytes.fromhex("aaaaaaaaaae5e5")   # Prepend the consumed preamble and the syncword (\xE5\xE5)
   )
In [79]: q.packet_modification.enabled = True # enable packet manipulation
Packet Repeater
Useful to repeat a packet, maybe after Packet Filter and Packet Manipulator.
Radio Module
Each connected radio will pop up as a module, progressively named after radioA, radioB, radioC, radioD, radioE.
RFQuack’s radio sub-system is based on RadioLib, so for most aspects you can refer to the RadioLib documentation. (yep, even for error codes).
Modem Configuration
Not all radio modules support modem configuration. Sub-gigahertz modems usually do. The q.radioA.set_modem_config() function takes as argument a rfquack_ModemConfig, which is built of the following optional parameters:
carrierFreq: this is the carrier frequency, easy; make sure you comply to the radio module you chosen.txPower: control the transmission power; set them wisely and make sure to follow the laws that apply to your country.preambleLen: control the length of the radio’s preamble.syncWords: sync-word matching is a basic functionality of most packet-radio modules, which allow to efficiently filter packets that match the sync words and just ignore the rest, in order to keep the radio chip and the MCU busy only when an expected packet is received; depending on the radio module, the sync words can be set to zero (promiscuous mode) or up to a certain number of octects (e.g., 4); in promiscuous mode, the radio and MCU will be very busy, because they will pick up everything, including noise.isPromiscuous: handy way to automatically set neat parameters and enter a fully promiscuous mode: sets syncword, disable crc filtering, disables automatic acknowledges, …modulation: this is the carrier modulation (ASK, OOK, FSK, GSK …); make sure you comply to the radio module you chosen.useCRC: whatever to enable or disable CRC filtering.bitRate: this is the symbol bitrate (in kbps); make sure you comply to the radio module you chosen.rxBandwidth: Sets receiver bandwidth (in kHz); make sure you comply to the radio module you chosen.
Usage example (on a CC1101 radio):
RFQuack(/dev/ttyUSB0, 115200,8,N,1)> \
  q.radioA.set_modem_config(modulation="OOK",
                            carrierFreq=434.437,
                            bitRate=3.41296,
                            useCRC=False,
                            syncWords=b"\x99\x9A",
                            rxBandwidth=58)
result = 0
message = 6 changes applied and 0 failed.
It’s not over 😛
Usually, radios receive and transmit packets. You can set the radio to expect a fixed length packet or, if it’s supported, you can ask the radio to look for the packet length in the payload itself. All of this can be done using the set_packet_len function.
Usage example (on a CC1101 radio):
RFQuack(/dev/ttyUSB0, 115200,8,N,1)> \
  q.radioA.set_packet_len(
    isFixedPacketLen=True,
    packetLen=102) # Sets len to 102 bytes.
result = 0
message =
Transmit and Receive
The tx(), rx(), idle() functions are self-explanatory: they set the module in transmit, receive and idle mode, respectively. To actually transmit data, you can use send(data=b"\xAA\xBB"), where data must be a list of raw octect values; there’s a limit in the length, which is imposed by the radio module, so make sure you check the documentation.
RFQuack(/dev/ttyUSB0, 115200,8,N,1)> \
  q.radioA.tx() # Enters TX mode.

result = 0
message =

RFQuack(/dev/ttyUSB0, 115200,8,N,1)> \
  q.radioA.send(data=bytes.fromhex("555555d42d"))

result = 0
message =
By default, a packet is transmitted only once. If you want to repeat it, just set repetitions to whatever you want, and RFQuack will repeat the transmission as fast as possible (bound by the MCU clock, of course).
Register Access
While RadioLib has gone very far in abstracting the interaction with the radio,
Some radio chips are really “unique,” so to speak. In these cases, the only option is to grab a large cup of your favorite beverage, read through the datasheet, read again, again, and again.
Once you understand enough of how the radio works at the low level, you want to get-set registers in order to use it. In principle, you can do pretty much everything via registers.
RFQuack is meant to be as generic as possible. What’s not directly abstracted within a module can be accomplished by setting the registers via the set_register and get_register function.
Usage example: retrieve the content of register 0x02
RFQuack(/dev/ttyUSB0, 115200,8,N,1)> q.radioA.get_register(int("0x02",16))
address = 2
value = 3
0x02 = 0b00000011 (0x03, 3)
Or alter it:
RFQuack(/dev/ttyUSB0, 115200,8,N,1)> q.radioA.set_register(address=int("0x02",16), value=int("0xFF",16))
result = 0
message =
Recall that Python lets you do nice things like q.radioA.set_register(address=int("0x02", 16), value=0x01001100) so you don’t have to do any conversions.
Note that every call to set_modem_config() will alter the modem state, including several registers to their default values (according to the datasheet). Also, many radio chips need to be in an “idle” state while setting certain registers. Please check the datasheet and use idle() before setting registers to be on the safe side. Last, be wise and double check that the values you set are actually there, using get_register after each set_register.
We noticed some timing issues with some radio chips. So, allow a small delay if you’re setting many registers in a row (e.g., for addr, value in regs: q.radioA.set_register(address=addr, value=value); time.sleep(0.2)).
Rolljam Module
Module implementing Samy Kamkar’s roll jam.
Custom Modules
It’s super easy to create a module! Please check src/modules/ and create your own. Do not forget to send a PR!
Interface
Every module extends the following interface, which exposes a series of hooking points to tap into the data-processing pipeline.
By overriding these hooks, you can change how each I/O packet is sent to the subsequent step:
onPacketReceivedafterPacketReceivedonLoopexecuteUserCommandstartset
#include "../RFQModule.h"
#include "../../rfquack_common.h"
#include "../../rfquack_radio.h"

extern RFQRadio *rfqRadio; // Bridge between RFQuack and radio drivers.

class MyAwesomeModule : public RFQModule, public OnPacketReceived,
                        public AfterPacketReceived, public OnLoop {
public:
    MyAwesomeModule() : RFQModule("AwesomeModuleSlug") {}

    void onInit() override {
        // onInit() is called once, when module is loaded.
        // here you can setup internal variables.
    }

    bool onPacketReceived(rfquack_Packet &pkt, rfquack_WhichRadio whichRadio) override {
       // onPacketReceived() is called when a packet is captured.
       // This method is called by the driver itself; you should use this method
       // for tasks which should be performed as soon as a packet is received.

       // If this method returns 'true' the packet is passed to the next module.
       // If this method returns 'false' the packet is dropped and no further
       // calls to modules will be performed.
       // If every module returns 'true' then the packet gets stored in memory.

       // Note: This method is called only if the module is enabled.

       // It you don't plan to use this hook, you can remove this method and stop extending OnPacketReceived
      return true;
    }

    bool afterPacketReceived(rfquack_Packet &pkt, rfquack_WhichRadio whichRadio) override {
      // afterPacketReceived() is called when a packet gets popped from RFQuack's
      // internal RX queue.
      // Here you should perform non-time-sensitive tasks as well as packet
      // modifications, retransmissions etc.

      // If this method returns 'true' the packet is passed to the next module.
      // If this method returns 'false' the packet is dropped and no further
      // calls to modules will be performed.
      // If every module returns 'true' then the packet will be sent to CLI.

      // Note: This method is called only if the module is enabled.

      // It you don't plan to use this hook, you can remove this method and stop extending AfterPacketReceived
      return true;
    }


    void onLoop() override {
      // onLoop(), as name suggests, is continuously called.
      // Here you can perform logic which does not fit in other hooks.
      // Note: This method is called only if the module is enabled.

      // It you don't plan to use this hook, you can remove this method and stop extending OnLoop
      return true;
    }

    void executeUserCommand(char *verb, char **args, uint8_t argsLen,
                            char *messagePayload, unsigned int messageLen) override {

      // Use macros to handle incoming CLI messages:

      // Set this bool from cli using: q.AwesomeModuleSlug.bool1 = True;
      // Get this bool from cli using: q.AwesomeModuleSlug.bool1
      CMD_MATCHES_BOOL("bool1",
                        "Set this bool from cli ",
                        boolExample)

      // Same applies to CMD_MATCHES_FLOAT, CMD_MATCHES_INT, CMD_MATCHES_UINT, CMD_MATCHES_WHICHRADIO


      // Call a method from cli with a Void argument:
      // q.AwesomeModuleSlug.start()
      // You'll have access to two variables:
      //        'reply':  Reply to be sent to client
      //        'pkt':    Deserialized argument received from client (rfquack_Void, in this case)
      CMD_MATCHES_METHOD_CALL(rfquack_VoidValue, "start", "Starts something", start(reply))

      // Call a method from cli with a protobuf argument, example with: "rfquack_Register"
      // q.AwesomeModuleSlug.set(address=2, value=3) # A rfquack_Register will be automatically created and sent.
      CMD_MATCHES_METHOD_CALL(rfquack_Register, "set", "Set something", set(pkt, reply))
    }

    void start(rfquack_CmdReply &reply) {
      // Do something.

      // Optionally with a message and a return code (0)
      setReplyMessage(reply, F("optional message!"), 0);
    }

    void set(rfquack_Register pkt, rfquack_CmdReply &reply) {
      // Use pkt.address;
      // Use pkt.value;
      setReplyMessage(reply, F("Done!"), 0);
    }

private:
    bool boolExample;
};
Usage
Dependencies
If you already have Python installed and usable as user, you can skip to the bottom.
We only require very few dependencies, namely Protobuf and PlatformIO. Most of the burden is on PlatformIO, which fortunately, can be installed as easy as a Python package.
If you don’t want to deal with any of this, you can opt for a Dockerized build system.
Protobuf
Installing the Protobuf compiler is pretty easy, but every system has its own package managers and compilers.
=== “macOS”
``` shell
brew install protobuf protobuf-c
```
=== “Ubuntu/Debian”
``` shell
apt install protobuf-compiler
```
Python and Pip
RFQuack needs Python 3.10.* installed and usable as $USER. It’s up to you to choose how you install and manage Python and Python packages in your system.
Check Python Installation
To verify that your Python installation is usable and you can install packages as user:
$ env python
Python 3.10.5 (main, Sep 20 2022, 10:54:01) [Clang 14.0.0 (clang-1400.0.29.102)] on darwin
Type "help", "copyright", "credits" or "license" for more information.
>>> print("hello world")
>>> hello world
>>> exit()
Let’s try to install a package:
pip install -U platformio
If this completes well, you’re good to go.
Have Pyenv and Poetry in Your Life
We highly recommend using Pyenv to manage Python on your system, and Poetry to manage Python project dependencies.
Installing Pyenv
curl https://pyenv.run | bash
The follow the Pyenv post-installation instructions and install & select the latest Python 3.10.* version (3.10.5 at the time of writing).
pyenv global 3.10.5
Installing Poetry
Please follow the official documentation.
curl -sSL https://install.python-poetry.org | python -
From now on, whenever you’ll select the just-installed Python 3.10.* version, it’ll come with Poetry.
RFQuack Dependencies
Now you can install the actual dependencies needed by RFQuack:
cd RFQuack
poetry install
Bonus: This will install the shorthand rfq to start the RFQuack CLI client.
With Poetry
$ poetry shell
Spawning shell within .venv

$ rfq
Usage: rfq [OPTIONS] COMMAND [ARGS]...

Options:
  -l, --loglevel [CRITICAL|ERROR|WARNING|INFO|DEBUG|NOTSET]
  -h, --help                      Show this message and exit.

Commands:
  mqtt  RFQuack client with MQTT transport.
  tty   RFQuack client with serial transport.
Without Poetry
cd RFQuack
pip install -r requirements.pip
Setup
Prepare Your Hardware
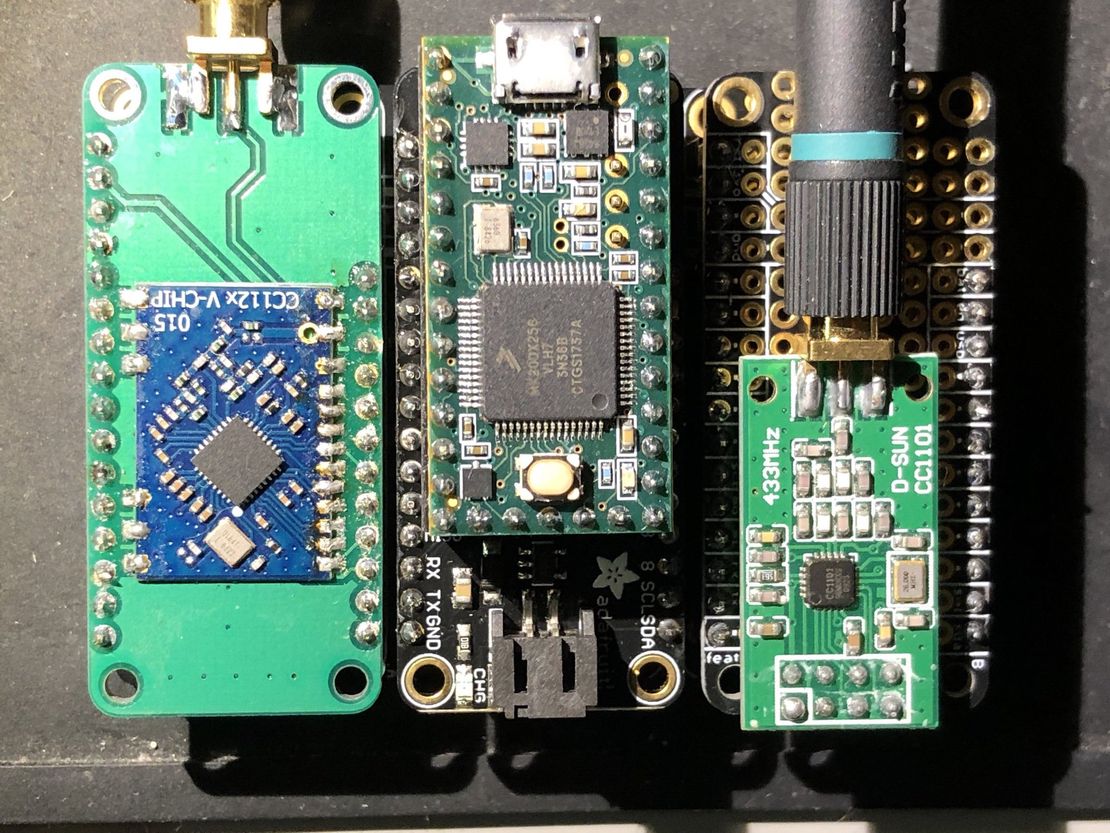
Choose the radio chip and board that you want to use among the supported ones:
- CC1101
- RF69
- nRF24
Assemble the board and the radio chip together: if you choose the Adafruit Feather system, all you have to do is stack the boards together, and do some minor soldering.
Connect the assembled board to the USB port.
Firmware Configuration
RFQuack’s build system is parametric, so that you can customize some functionality without touching the code. This means that the build system “compiles” a template main.cpp based on some variables, before running the actual compilation step (from C++ to binary executable).
The build process is baed on PlatformIO and will read variables from two files:
- platformio.ini: board and platform definition.
- Default:
featheresp32(ESP32)
- Default:
- build.env: type of radio(s) and connections.
- Default: 3 radios (CC1101, nRF24, RF69) connected “randomly” (likely you’ll need to change this).
General Configuration
| Variable | Description | Required |
|---|---|---|
RFQUACK_UNIQ_ID | Unique identifier for this node (defaults to RFQUACK) | No |
SERIAL_BAUD_RATE | Defaults to 115200 | No |
USE_MQTT | Disables Serial transport and enables the MQTT one | No |
WIFI_SSID | WiFi SSID | Yes, if USE_MQTT |
WIFI_PASS | WiFi Password | Yes, if USE_MQTT |
MQTT_HOST | MQTT Broker host | Yes, if USE_MQTT |
MQTT_PORT | MQTT Broker port (defaults to 1883) | No |
MQTT_USER | MQTT Broker username | No |
MQTT_PASS | MQTT Broker password | No |
MQTT_SSL | Enables MQTT over SSL (put your certificates into rfquack_certificates.h) | No |
Radio Configuration
RFQuack supports up to 5 radios, up to what your board supports (i.e., enough interrupt and chip select pins). You must configure, at least, RadioA:
| Variable | Description | Required |
|---|---|---|
RADIOA | Chosen modem for RadioA: (options: rF69, CC1101, nRF24 case sensitive) | Yes |
RADIOA_CS | Chip select pin for RadioA | Yes |
RADIOA_IRQ | Interrupt pin for RadioA. It’s labeled IRQ on nRF24 modules, or GDO0 on CC1101 ones | No |
RADIOA_RST | Reset pin for RadioA (called chip enable pin in nRF24 ) | nRF24 only (optional for others) |
RADIO<X> | Chosen module for RadioA: (options: RF69, CC1101, nRF24) | No |
RADIO<X>_CS | Chip Select pin for RadioX | No |
RADIO<X>_IRQ | Interrupt pin for RadioX (e.g., labeled IRQ on nRF24 modules, GDO0 on CC1101) | No |
RADIO<X>_RST | Reset pin for RadioX (needed only for nRF24 radios) | No |
Valid values of <X> are B, C, D, E.
Modules Configuration
RFQuack comes with some built-in modules, which are not enabled by default to keep the firmware lightweight. If you want to enable them, define the following variables into build.env:
GUESSING_MODULEFREQ_SCANNER_MODULEMOUSE_JACK_MODULEPACKET_FILTER_MODULEPACKET_MOD_MODULEPACKET_REPEAT_MODULEROLL_JAM_MODULE
For more information, check out the Modules section.
Example Configurations
ESP32 + CC1101
This is the declaration of an RFQuack dongle based on an featheresp32 board and 1 CC1101 radio.
General Configuration
This is the declaration of a featheresp32-based board in PlatformIO:
; ...you can ignore what's above this...

[env:featheresp32]
extends = env:espressif32
board = featheresp32
Now let’s combine it with a CC1101 radio.
Radio Configuration
RADIOA=CC1101
RADIOA_CS=2
RADIOA_IRQ=5
- Chip select (CS) to pin 2, which means that your radio’s CS is connect to pin 2 on the
featheresp321. - Interrupt (IRQ) to pin 5, which means that your radio’s default 2 digital I/O pin is connected to pin 2 on the
featheresp32.
More Examples
We’ll add more examples in this section. Meanwhile, please check the examples/ folder for inspiration.
Build
This section assumes that you’ve installed the required dependencies, prepared your hardware, and configured the firmware.
All the build system is based on PlatformIO, which will take care of installing all the dependencies automatically.
Build on a *NIX host
We have tested this on a macOS and Linux host. Your mileage may vary.
cd RFQuack
make clean build
Build via Docker
We have tested this on a macOS host with Docker Desktop for Mac.
cd RFQuack
make docker-build-image
make build-in-docker
Flash
Now you’re ready to connect the board via USB and flash it!
Check for Connected Boards
No Devices
If there are no RFQuack boards connected, you’ll see something like this (or maybe just empty).
$ make lsd
pio device list
/dev/cu.Bluetooth-Incoming-Port
-------------------------------
Hardware ID: n/a
Description: n/a
Device Found!
If there is at least one RFQuack board connected, you’ll see something like this. We recommend having one board connected at a time.
$ make lsd
pio device list
/dev/cu.Bluetooth-Incoming-Port
-------------------------------
Hardware ID: n/a
Description: n/a

/dev/cu.usbserial-016424A3
--------------------------
Hardware ID: USB VID:PID=10C4:EA60 SER=016424A3 LOCATION=20-2
Description: CP2104 USB to UART Bridge Controller - CP2104 USB to UART Bridge Controller
The actual port name may change. In this specific case we can see an UART controller connected at /dev/cu.usbserial-016424A3.
Let’s Flash!
Without further ado:
make flash
Command Line Interface Client
To talk to your RFQuack dongle, you have two options:
- MQTT
- Serial
Let’s see the pros and cons of each.
MQTT Transport
(and hardware serial console)
Install or have access to an MQTT broker (Mosquitto is just perfect for this):
- PROs
- you don’t need cables (hint: your RFQuack hardware can be battery powered)
- if you want to connect the RFQuack hardware to your computer, you get a free (hardware) serial console for monitoring on the USB port
- CONs
- you need network connectivity (WiFi or cellular)
- there’s latency
Serial Transport
Connect the dongle via USB
PROs
- there’s little latency
- you don’t need to rely on network stability
CONs
- your range is limited by the length of your USB cable (you don’t say! 😮)
Command Line Interface
Now you can use RFQuack via the IPython-based shell.
Test the Shell
$ rfq --help
Usage: rfq [OPTIONS] COMMAND [ARGS]...

Options:
  -l, --loglevel [CRITICAL|ERROR|WARNING|INFO|DEBUG|NOTSET]
  -h, --help                      Show this message and exit.

Commands:
  mqtt  RFQuack client with MQTT transport.
  tty   RFQuack client with serial transport.
CLI via MQTT Transport
To use this, you’ll have to build a firmware configured to use the MQTT transport. Please check the USE_MQTT configuration variable in this manual.
$ rfq mqtt --help
Usage: rfq mqtt [OPTIONS]

  RFQuack client with MQTT transport. Assumes one dongle per MQTT broker.

Options:
  -i, --client_id TEXT
  -H, --host TEXT
  -P, --port INTEGER
  -u, --username TEXT
  -p, --password TEXT
  -h, --help            Show this message and exit.
CLI via Serial Transport
This is the default transport, unless USE_MQTT is set in the build.env file.
$ rfq tty --help
Usage: rfq tty [OPTIONS]

  RFQuack client with serial transport.

Options:
  -b, --baudrate INTEGER
  -s, --bytesize INTEGER
  -p, --parity [M|S|E|O|N]
  -S, --stopbits [1|1.5|2]
  -t, --timeout INTEGER
  -P, --port TEXT           [required]
  --help                    Show this message and exit.
Examples
More concretely:
$ rfq tty -P /dev/ttyUSB0
2019-04-10 18:04:31 local RFQuack[20877] INFO Transport initialized
2019-04-10 18:04:31 local RFQuack[20877] INFO Transport initialized (QoS = 2): mid = 2

...

RFQuack(/dev/ttyUSB0, 115200,8,N,1)> q.radioA.set_modem_config(modulation="OOK", carrierFreq=434.437)

result = 0
message = 2 changes applied and 0 failed.

RFQuack(/dev/ttyUSB0, 115200,8,N,1)> q.radioA.rx()

result = 0
message =
...
At this point you’re good to go from here!
Inline Help
RFQuack(/dev/cu.usbserial-0001)> q.radioA.help()
Help for 'radioA':

> q.radioA.set_modem_config(rfquack_ModemConfig)
        Apply configuration to modem.

> q.radioA.set_packet_len(rfquack_PacketLen)
        Set packet length configuration (fixed/variable).

> q.radioA.set_register(rfquack_Register)
        Sets register on underlying modem.

> q.radioA.get_register(rfquack_UintValue)
        Retrieve register value from underlying modem.

> q.radioA.send_to_transport = ...
        Whatever to send received packets to transport

> q.radioA.send(rfquack_Packet)
        Send a packet over the air

> q.radioA.rx(rfquack_VoidValue)
        Puts modem in RX mode

> q.radioA.tx(rfquack_VoidValue)
        Puts modem in TX mode

> q.radioA.jam(rfquack_VoidValue)
        Starts jamming

> q.radioA.idle(rfquack_VoidValue)
        Puts modem in IDLE mode

Check src/rfquack.proto for type definitions
Support & More
Join the RFQuack community! Help others and get help!
- Discord: https://discord.gg/6c8hcGbdc5
- Twitter: https://twitter.com/rfquack
Talks & Publications About RFQuack
If you use RFQuack and find it useful, we’d appreciate if you cite at least one of the following resources:
- RFQuack - Cheap and easy RF analysis, Andrea Guglielmini, CanSecWest 2020
- RFQuack: The RF-Analysis Tool That Quacks, Federico Maggi, HITB Amory, Amsterdam, May 9, 2019 [PDF]
Research and projects using RFQuack
A Security Evaluation of Industrial Radio Remote Controllers, Federico Maggi, Marco Balduzzi, Jonathan Andersson, Philippe Lin, Stephen Hilt, Akira Urano, and Rainer Vosseler. Proceedings of the 16th International Conference on Detection of Intrusions and Malware, and Vulnerability Assessment (DIMVA). Gothenburg, Sweden, June 19, 2019 [PDF]
A Security Analysis of Radio Remote Controllers for Industrial Applications, Jonathan Andersson, Marco Balduzzi, Stephen Hilt, Philippe Lin, Federico Maggi, Akira Urano, and Rainer Vosseler., Trend Micro, Inc. Trend Micro Research, January 15, 2019 [PDF]
- Attacking Industrial Remote Controllers, Marco Balduzzi and Federico Maggi, HITB2019, Amsterdam [Video]
- How we reverse-engineered multiple industrial radio remote-control systems, Stephen Hilt, BSides Knoxville 2020, [Video]
- Attacking industrial remote controllers for fun and profit, Dr. Marco Balduzzi, CONFidence 2019, [Video]
- How we reverse-engineered multiple industrial radio remote-control systems, Stephen Hilt, CS3STHLM 2019, [Video]
Development Status and Maturity
RFQuack is quite experimental, expect glitches and imperfections. So far we’re quite happy with it, and used it successfully to analyze some industrial radio protocols (read the Trend Micro Research white paper or the DIMVA 2019 paper for details).
FAQ
How do I solve build errors?
RFQuack’s build system is heavily based on PlatformIO. If you’re getting build errors, it’s very likely that you’ll be able to get some hints on how to solve them in the PlatformIO documentation or support forum.
How do I get support?
RFQuack is an open-source project and support is through its community.
How do I report a bug or security vulnerability?
First of all, thanks! If you found a bug or security vulnerability, reporting it is the most responsible thing you could do and a great form of contribution for the community. This said, please file an issue choosing the appropriate type.
How do I request a new feature?
Although the development of this project is mostly following an irregular schedule due to its pro-bono nature, we’re happy to receive suggestions on new features. This said, please file an issue choosing the appropriate type.
Disclaimer
RFQuack is a research tool intended to analyze and emit radio-frequency (RF) signals via software, with native hardware support. Although it is not intended for illegal, malicious or offensive purposes, it can be used to those ends. We take no responsibility whatsoever about the unforeseen consequences of unethical or illegal use of this software.
See Figure 9 and Table 19 of TI CC1101 datasheet for more details. ↩︎